Here’s how to fix self-assigned IP address issue on Mac. Is it difficult for your MacBook to connect to the Internet, even if Wi-Fi or Ethernet operate fine? This might be caused by an incorrect IP address on your Mac. Do not worry! There are issues with the Mac’s standard IP address. This tutorial will teach you how to fix self-assigned IP address issue.
Before we consider remedies, let’s describe the problem.
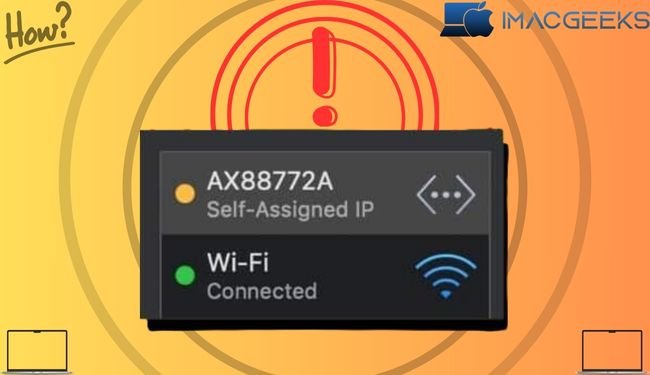
What does “self-assigned IP address” mean on Mac?
On a Mac, the “self-assigned IP address” problem arises when your device assigns an IP address and builds an ad hoc network rather than receiving one from the router or DHCP server. The network does not recognize this self-assigned IP address.
This prohibits your Mac from connecting to the internet or other network devices, so reducing network connectivity. This problem is caused by network configuration problems, DHCP server outages, or Mac network or firewall difficulties.
What to do if your Mac has a self-assigned IP address? Continue reading to learn how to solve the issue and restore Mac network functionality.
- Make sure you are able to join.
- Restart your network equipment.
- Connect to your Wi-Fi again.
- Check how you’re linked.
- Clear your Mac’s network settings.
- Renewal of DHCP Lease for macOS.
- Create a new network location.
- Clear the Mac’s firewall.
- You may set Service Order from your Mac’s network settings.
- Apple Mac: Change DNS Servers.
- Search for an IP address that does not match.
- Turn off the VPN.
Check your connection
Before configuring Mac-specific options, ensure that your router is operational and close enough to your Mac to obtain an IP address. Connect your Ethernet cable snugly.
I also check the cable’s condition and faultlessness. Replace your old Wi-Fi router for a faster connection.
Reboot your network devices
Sometimes rebooting your modem and router solves network problems. Turn off all gadgets, unhook the wires, and wait. It will cool them down because heat might cause difficulties. After that, connect all cables to the power outlet and turn them on.
While you wait, restart your Mac to resolve macOS difficulties:
- Press the Apple symbol.
- Click the Restart button.
Rejoin your Wi-Fi network
If your Mac has the self-assigned IP address problem, you may merely need to forget about your Wi-Fi network and reconnect.
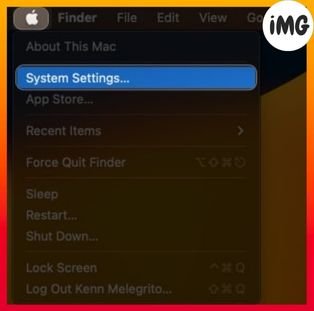
- To access System Settings, click the Apple symbol.
- Select Wi-Fi. Select “Details” next to your Wi-Fi name.
- Select the “Forget This” option.
- Select Remove.
- First, turn off and then on Wi-Fi.
- Choose “Connect” beneath your Wi-Fi network.
- Enter the passphrase and click “OK.”

Check your connection settings
Check that your Mac’s network settings are set appropriately. To automatically acquire IP addresses and DNS information, you must enable the relevant network settings.
- Navigate to your Wi-Fi details.
I’ve shown the steps above. - Choose TCP/IP from the left side.
- Ensure that Configure IPv4 is set to DHCP and Configure IPv6 is set to Automatically.

You may also try turning off IPv6, since some customers complained that it interfered with the IP address assignment process.
- Click on the drop-down arrow next to Configure IPv6.
- Select “Link-Local Only.”
Reset your Network Preferences on Mac
Resetting network preferences will help to eliminate the IP address misconfiguration that causes the internet not to work. You must remove specific files related to network connectivity from your MacBook.
- Launch Finder.
- Click Go and Go Folder.

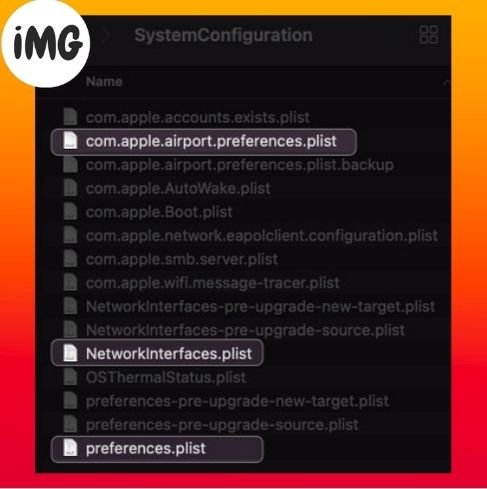
- In the pop-up window, type. /Library/Preferences/SystemConfiguration/
- Delete these files:
com.apple.airport.preferences.plist
Networkinterface.plist
preferences.plist - Enter your Mac’s password to confirm the deletion.
- Restart your Mac.
It will automatically rebuild any deleted files. - Login and connect to your WiFi network.
- Return to the TCP/IP settings and examine the router files.
Renew DHCP Lease on macOS
This process is used when the assigned IP address expires or conflicts. When you renew your lease, your Mac contacts the DHCP server to request a new IP address. It refreshes the configuration and resolves connectivity issues.
- The exact TCP/IP tab window from Wi-Fi Details appears.
- Renew the DHCP Lease.
- Select Apply.
Try connecting to your network after renewing the lease. If this doesn’t help, you can create a new network location and renew the lease.
Create a new network location
A new network location resets your Mac’s network settings and deletes its self-assigned IP address.
- Click on the System settings.
- Select Network in the left-hand panel. Click on the three dots.
- Select Edit Locations in the Locations menu.
- Click (+). to add a location.
- After naming the network location, click Done.
- Wait for your Mac’s connection to WiFi to take a few moments.
Renew your Mac’s DHCP lease and try reconnecting to your network. When you update system settings, you may have issues with your Mac firewall configuration. Resetting the firewall should resolve this issue.
Reset the Firewall on your Mac
- Launch Finder.
- Click Go and Go Folder.
- Enter /Library/Preferences – Press the Return key.
- Delete com.apple.alf.plist.
- Restart Mac.
You’ll be asked to grant access to a number of programs and services after your system has booted. Enable access depending upon your choice. Connect to your network again and see if you still get the error.
You can temporarily disable the Firewall if you’re unsure whether to delete it. Switching off the Firewall in your Mac will help you determine if there are any network issues.
- Click on the System settings.
- Select network on the left panel. Then select the firewall.
- Turn off the Firewall.
- Reboot your Mac and restart it.
Set Service Order from Mac’s network settings
Adjusting the service order will prioritize the network interface, ensuring that your Mac connects to your preferred network.
- Select the Apple logo → System Settings → Network.
- To set a service order, click the three dots symbol.
- Drag services and drop them to the top. Click Ok.
Wi-Fi is the default. Drag it to the front.
Change DNS Servers on macOS
Discarding old DNS and moving to other DNS servers can alleviate DNS-related difficulties that may be causing the self-assigned IP address error.
- Go to System Settings → Wi-Fi. Click Details next to your Wi-Fi name.
- Select DNS from the left panel, then click the addition symbol (+).
- Add the following numbers:
8.8.8.8
8.8.4.4
1.1.1.1
9.9.9.9 - Click OK.

Check for conflicting IP address
Make sure that no other devices on your network have the same IP address as your Mac. Check your router’s DHCP client list to ensure that all devices are issued unique IP addresses.
Disable VPN
If you have a VPN service activated, turn it off momentarily to see if it resolves the self-assigned IP address problem. Open your Mac’s VPN settings and disable the VPN connection.
Bonus fixes
If the troubleshooting steps discussed above do not resolve the self-assigned IP address issue on your Mac, you may need to try more difficult repairs.
- Update Mac OS to latest version.
- Check to make sure your Mac does not contain any viruses or malware.
- Check that your network devices work properly and there aren’t any hardware issues.
- Restart the router or modem
- Clear the System Settings Memory on Mac by Resetting NVRAM and PRAM.
Tips to Avoid Self-Assigned IP Address Issues on Mac
It is frustrating when your Mac cannot access the internet due to a self-assigned error. You must therefore take precautions in order to prevent such an inconvenience from occurring again.
- Update your Mac regularly
- Restart your Mac, router or other network device every now and then
- Replace your outdated router or modem with a brand new one for optimal performance. Configure the network using high-quality equipment.
- Connect your Mac only to one network. For a more stable connection, I recommend using an Ethernet cable.
- Avoid connecting too many devices at once to your Wi-Fi, as this can cause network overload.
Get back your smooth internet access!
If you encounter a Mac self-assigned error, it will hamper your work. You should fix the problem as soon as possible. These troubleshooting methods can help you resolve the problem and restore a reliable and stable network connection.
Contact Apple Support if the problem hasn’t been resolved.