
Not sure how to get started with Apple Numbers on Mac? Numbers is a useful spreadsheet program included with macOS that may be used for both commercial and personal purposes. But there are more reasons to use Numbers, including beneficial features that may make it one of your favorite go-to apps.
We’ll go over various strategies for utilizing Apple Numbers on Mac. Open Numbers and follow along as we go from creating a template to using conditional highlighting!
How to begin with a template in Numbers
If you want to get started on your Apple Numbers spreadsheet, you may use a template. You’ll discover a good range of personal, corporate, and educational templates for everyday work.
- Launch the Numbers program on your Mac and choose New Document.
If the app is already open, go to the menu bar and select File > New. - Use the menu on the left side of the next screen to select a category, or select All Templates to view them all. You may construct everything from a job checklist to a household budget to a class timetable.
- When you find the one you want, pick it and click Create in the bottom right.

When the template opens, simply enter your own information. You may also customize the template formatting to fit your needs.
How to use Numbers to sort data
Manually adjusting a spreadsheet with a large amount of data might take a long time and increase the likelihood of mistakes. Instead, utilize the sort option to organize the data in your spreadsheet.
- Select the sheet you wish to sort, then click the Organize button in the upper right corner and select the Sort tab.
- If you only want to sort specific rows, select them and then choose Sort Selected Rows from the top drop-down box in the sidebar. Alternatively, you may select Sort Entire Table.
- In the Sort by section, select the column you wish to sort by using the drop-down box. You may then select either ascending or descending order.
- If you want to sort by another column, choose it together with the order shown below the initial sort settings you chose.
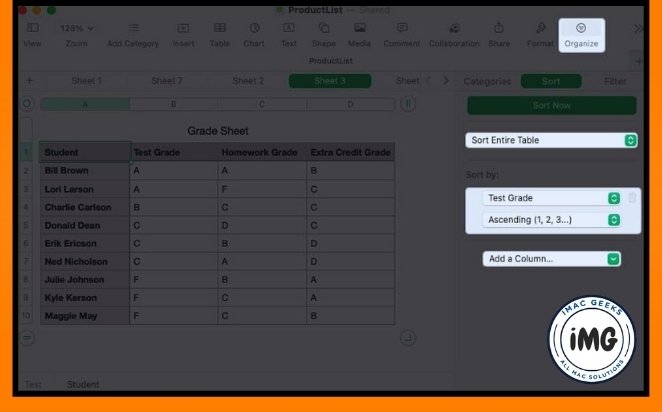
- Your data should be sorted automatically, but if you want to add more columns to sort by, click Sort Now at the top of the sidebar.
How to include a link in Numbers
Perhaps you’d like to provide a link to another sheet or an easy method to get to a website. In Apple Numbers, you may create a link to a spreadsheet, an email address, a website, or a telephone number. Then, with a single click on the link, you may open the spreadsheet, send an email, go to the website, or make a call.
- Double-click or drag your cursor through the information in the cell to which you want to link. If you only choose the cell, you’ll find that the connection options are
- Go to Format in the menu bar, then Add Link, then select an option from the pop-out menu. unavailable.
- When the little window displays, enter the link’s details. For example, enter a website URL or a phone number. You can also change the display text if required.
- To apply the hyperlink to the content, click the button on the bottom right that corresponds to the type of link you selected.
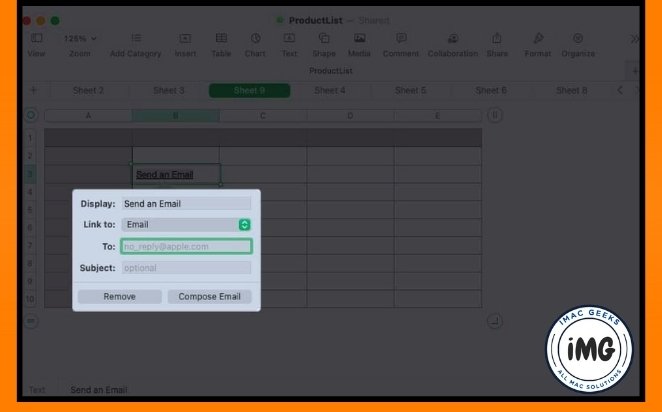
To edit or remove the link later, go to the menu bar and click Format, then Edit Link or Remove Link.
How to use Numbers to construct a chart
Charts and graphs are excellent graphics for presenting facts. They allow you to quickly identify highs and lows, trends, and patterns. Apple Numbers supports 2D, 3D, and interactive charts.
- Choose whatever data you wish to include in the graphic.
- Either click the Chart button in the toolbar or select Insert from the menu bar and then Chart.
- You’ll see all of the available chart kinds, such as bar, column, pie, scatter, and more. Choose the kind, and the chart will appear on your sheet.

- When you change the data in your spreadsheet, your chart will instantly update.
- To change the look of the chart, pick it and then click Format in the upper right. You may then change the color scheme, tweak the axes, add data labels, and more.
- To alter the data you wish to include, choose the chart and then click Edit Data References at the bottom.
How to do basic calculations in Numbers
One of the most typical things you’ll do on your Apple Numbers sheet is do calculations. Fortunately, you can add, average, or extract the maximum amount from a data collection with a few clicks.
- Go to the cell in which you want the computation results.
- To pick Formula, either utilize the Insert toolbar or the Insert menu bar.
- Then, select the calculation you wish to employ.
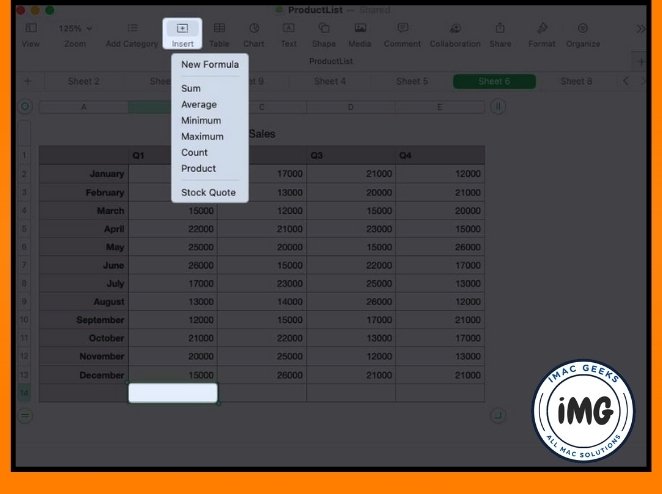
When you choose the bottom cell or the far-right cell to conduct the calculation, Apple Numbers will utilize the values in the column or row, respectively.
To change the calculation formula, double-click the cell to bring up the formula bar. Then, make your adjustments and save them using the green checkmark.
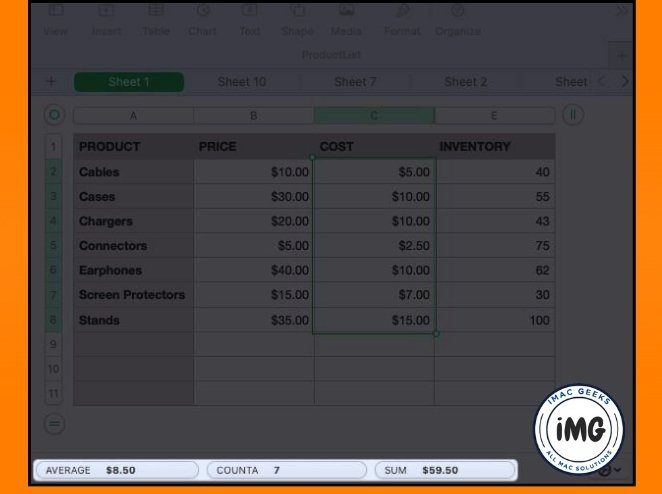
View calculations at glance
Perhaps one of these computations will be useful to you, but you don’t have to include it in your document. Alternatively, you have the option to show one or more of them at the window’s bottom.
- Choose a set of your sheet’s cells that have values in them. Next, select the gear icon that appears in the window’s lower right corner.
- Select which calculations to show, and a checkmark will appear next to each.
- The calculation(s) at the bottom will then be visible to you with just a quick glance when you choose one or more cells on the sheet.
How to add formulae in Numbers
Formulas are used in the simple computations given above. Apple Numbers allows you to go beyond the fundamentals by inputting sophisticated formulae and performing a range of operations.
Because formulae and functions in Apple Numbers may make for a lengthy article, we’ll only go over the basics here.
- To input a formula, type the equal symbol (=) in the cell to show the formula bar.
- Enter the formula you wish to use into the formula bar. If you start your formula with a function, recommendations will appear at the bottom. If you select one, you will get instructions in the formula bar to help you finish the formula correctly. Simply update the instructions with your information.
- You may also visit the Format sidebar to obtain further guidance with functions. You may look for one, learn about its applications, and then click Insert Function to include it in your calculation.
- When you’ve finished typing the formula, hit the green checkmark to apply it and get your results.

Tips: You can quickly view the formula by selecting the cell. The formula will appear at the bottom.
Examples of formulae and functions
Here are a few formulas that you can use in Numbers.
You can use the IF function to return a result based on a true/false condition. If the value in cell B2 exceeds 20,000, you can return Yes. Otherwise, return No. The formula that you would use is shown in the bar below:
IF(B2>20000,"Yes","No")
The CONCAT function allows you to combine text from many cells. For example, you may merge the first name in cell B2 and the final name in cell C2 and save the result in cell D2. You may also include a space (inside quotes) between the names. Here’s the formula as it appears in the bar at the bottom:
CONCAT(B2,” “,C2)
How to use cell formatting in Numbers
Depending on the sort of data you enter into Apple Numbers, you may want or need to style it accordingly.
For example, you may want numbers represented as currency, percentage, or date. While Apple Numbers has an automatic formatting option, you may select and edit certain data types.
- To open the sidebar, choose a cell or data range and then click Format.
- To select the data type, navigate to the Cell tab and click the Data Format drop-down box.
- You may customize the extra formatting that appears behind the type. For example, if you select Currency, you may specify the currency type, adjust the decimal places, and include a thousand separator.
How to apply interactive formatting in Numbers
Along with formatting the data, you may also format a cell with an interactive element such as a checkbox or slider. This allows you to quickly and easily tick off jobs, choose values, or provide a rating.
- To open the sidebar, choose a cell or range and then click Format.
- Go to the Cell tab and select one of the interactive formatting types from the drop-down box at the bottom of the list.
- Checkbox: Click the box to check it. When checked, the value is True; unchecked, it is False.
- Star Rating: Choose a dot for the Apple Numbers of stars you want to use in a rating system. You can select from zero to five star ratings.
- Slider: Select a value using a vertical slider. Add the increments, minimum and maximum after selecting Slider from the drop-down menu. You can choose a particular data format, such as a number, currency or percentage.
- Stepper: A Stepper is similar to a Slider, except that you can use arrows instead of sliders to increase and decrease the value.
- Popup menu Create your own menu by adding items to the sidebar. Select the arrow on the right side to open the popup menu, and then select an item.
How to utilize autofill in Numbers
Autofill is a terrific function that may really save you time. It allows you to drag from one or more cells to fill other cells with the same value, pattern, or formula.
The simplest approach to illustrate how to utilize autofill is to provide a few examples.
Fill the same value automatically
We want to copy this value to the three last cells of the column. Hovering your cursor above the selected cell will display a yellow dot. Drag the dot down and release it to fill all the cells with that value.
Fill in a pattern automatically
The next step is to list all the months in the year. You can drag the yellow dot to the next cell and fill out the rest of the months without having to type them manually.
Fill in a formula automatically
You can copy-paste formulas or calculations that you entered into one cell and want to use them in another. Apple Numbers update the cell references to ensure that they are applied to the correct cells.
We now have the total for Q1. Drag the SUM formula from the cell to the adjacent cells to get the totals of the other quarters.

How to use conditional highlighting in Numbers
Conditional highlighting allows you to automatically format your data when it fits specific parameters that you specify. For example, you may change the font color of integers smaller than another Apple Numbers or the cell fill color of dates after a specified date.
- To access the sidebar, choose the cells you wish to format and click Format.
- Go to the Cells tab and choose Conditional Highlighting.
- At the top, select Add a Rule. Choose a rule type from the list on the left side of the pop-up box.
You can select Number, Date, Text, Duration, or Cell. - You’ll then see the available circumstances for that cell type on the right. Choose an option.
- Then, in the sidebar, fill out the remaining specifics for the rule, including any extra variables and formatting you wish to use.
- Once you’ve finished, click Done.
- To examine, change, or remove a conditional highlighting rule, reopen the Format sidebar and select Show Highlighting Rules from the Cell tab.
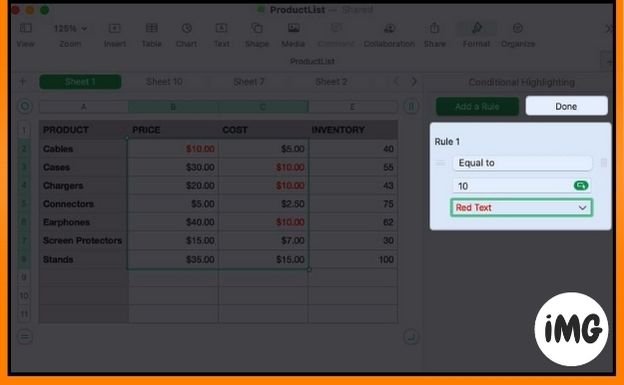
Let us look at an example.
We’ll use red font to format values equal to 10. Begin by selecting Number and Equal To.
Then, enter the value “10” and select Red Text from the format drop-down selection.
Now, whenever a number in our dataset is 10, the red text will stand out, making it simple to recognize.
Do More with Numbers on Mac
If you use a Mac and want to accomplish more with Apple Numbers, these suggestions can help you get started. And if you have any suggestions to contribute or want us to cover something particular to Apple Numbers, please let us know!