Here’s Delete key not working on Mac. Do you have problems with the delete button on Mac? It’s not only you that has encountered this issue. It’s a problem that many MacBook users face, but thankfully there are some simple fixes. This blog will discuss how to fix delete key not working MacBook.
1. Clean your Mac keyboard
Try cleaning your keyboard if your Macbook delete button is not working. Over time, dust or debris can cause the delete key not to work.
What you should do
- Close your Mac and disconnect the external power source.
- Turn it over and gently tap its back. This will remove any loose particles.
- Press the key repeatedly to loosen up a stiff key.
- Use compressed air to remove any dust that remains between the keys.
- If necessary, use isopropyl to dampen a cloth without lint and wipe each key.
- Be cautious. A device can be permanently damaged by liquids or excessive pressure.
- After cleaning, let your system dry.
Turn your Mac on again and see if you can use the delete key properly.
This cleaning method should resolve any issues that your delete key is having and restore it to its normal operation.
2. Keyboard Viewer Enabled
It’s now time to deal with this issue professionally. The Keyboard Viewer is a great solution if your Mac’s delete key starts to cause you problems. This feature lets you see a virtual keyboard on your screen. It highlights the keys you press as you type.
To enable Keyboard Viewer on your Mac, follow the steps below:
- Click on the Apple Logo () to access System settings.
- Select the Keyboard option from the menu.
- Click Edit next the Input Sources Tab.
- The Show input menu will appear in the menu bar.
- Click Done to exit the interface.

- Click the Keyboard icon from the menu bar.
- Select to show the keyboard viewer.
- A virtual keyboard will then appear on your computer screen.
This tool will help you determine if your delete key is defective or if the problem is software-related. Enabling this feature can also be a temporary solution until you find the permanent fix for your delete key problem.
3. Turn off slow keys on your Mac
Slow Keys may be on if you notice your MacBook keyboard is responding slowly. You’ll need to hold down the keys longer than normal before they show up on the screen. To fix this problem:
- Navigate to Apple Logo ().
- Go to the Accessibilitymenu.
- Select the Keyboard option.
- If enabled, disable Slow keys.
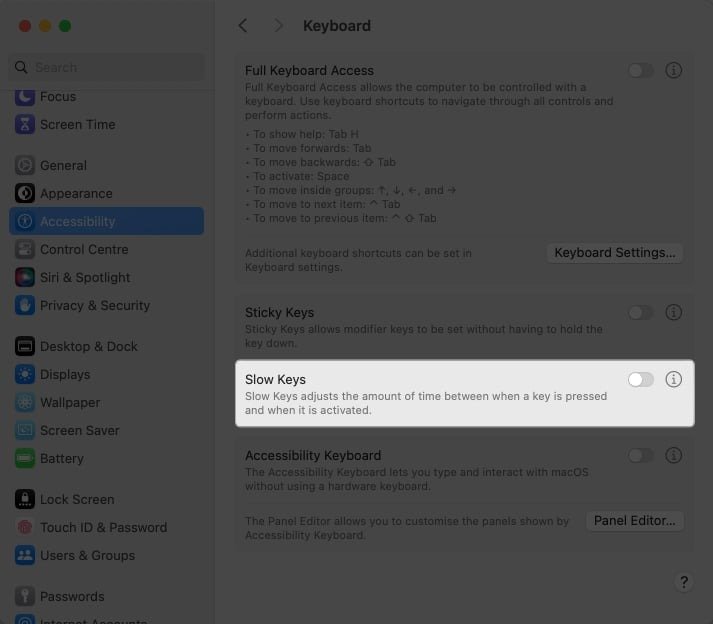
This solution is applicable if your MacBook is an older model or if this accessibility feature has been enabled on purpose.
4. Check the connection of a wired keyboard
You who have a MacBook wired external keyboard, I will not leave you in the dark. The keyboard connection could be the cause of the delete key not working on your keyboard.
- First, make sure that your keyboard works with your MacBook. I like to go directly to the product description or website of the keyboard you bought. Find the model number for your Mac.
- Unplug the keyboard and use a soft bristle brush to clean out the ports if everything looks good.
- Clean the ports gently if they have become dusty over time.
- Plug in your keyboard once more.
- Finally, inspect the cable to check for visible damage and fraying which could affect its functionality.
Try connecting the keyboard to another USB port. It could be that the problem is with the port and not the keyboard.
5. Unpair and Re-pair Your Bluetooth Keyboard
Un-pairing and re-pairing your Bluetooth keyboard could be a solution for you if your MacBook’s wireless keyboard has a nonresponsive delete key.
Start with the beginning.
- Access Bluetooth by navigating to System settings.
- Click Disconnect to disconnect your keyboard from other devices.
- The Info icon will appear next to the keyboard.
- When prompted, select This device or this device.
- After the keyboard has been successfully depaired, let it rest for some time.
- Put your keyboard into discoverable mode.
- Wait for Mac to recognize your keyboard.
- Click Connect to connect the two.
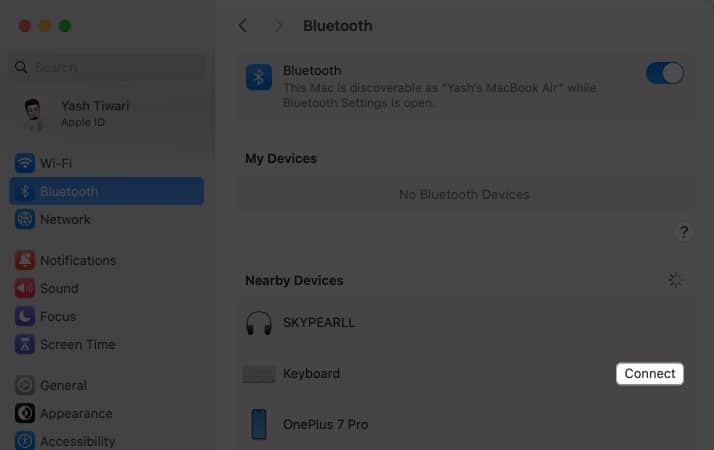
- Use the commands on the screen for a successful pairing of the keyboard and your Mac.
These steps will tend to refresh the link between devices. After your keyboard has been paired, use the backspace button as you would normally. This should resolve any problems you are experiencing with the delete key.
6. Restart Your Mac
If none of the methods above have worked, you can try restarting your Mac. To comply, follow the instructions below:
- Start by clicking the Apple Logo () in the upper-left corner.
- Select and restart.
- You can also press the Control, Command and Power buttons simultaneously to force a system reboot.
Check if your Mac has rebooted and the Delete key is working again. If restarting your Mac doesn’t fix the problem, try the solutions below.
7. Remove Keyboard PLIST File
If the delete key is still not working properly on your MacBook then you can try deleting the Keyboard Property List file (PLIST). These files contain various keyboard settings on your computer, including keyboard preferences.
What you should do is:
- Click Go from the menu bar.
- Choose the Go To Folder option.
- Copy and paste the ~/Library/Preferences path.
- Click Return to continue.
- Find the following files in the menu:
- apple.Keyboard-Settings.extension.plist
- com.apple.keyboardservicesd.plist
- Select both and Move Bin.
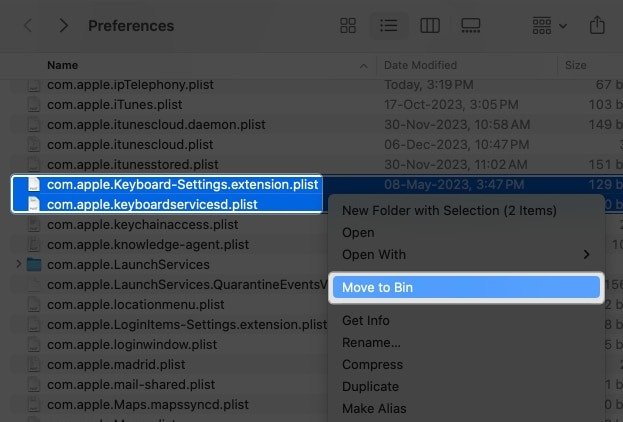
- As we have discussed, you can now close the menu, and restartyour Mac.
- The deleted files are recreated upon restarting the computer.
This method resets the keyboard to its default settings and is known to fix issues like non-responsive keys or those that are not functional, such as the delete key in a MacBook.
I strongly recommend that you back up any important data prior to modifying the system files.
8. Reset the PRAM or NVRAM of your Macbook
Let’s take our guide to the next level. By resetting the PRAM or NVRAM of your Mac you can fix your Mac’s backspace not working issue.
This method will refresh all system settings including the keyboard configurations. Check if the delete key works as it did before. There may be underlying problems that need professional assistance.
9. Remove without using the Delete Key
It’s possible your delete key has stopped working if you have tried all of the above solutions and none worked. Like all electronic devices and keyboards have a limited life span, they will eventually wear out.
If all the other keys are working properly, it may not be necessary to replace your entire keyboard. There are a few other ways to delete text from your Mac without having to use the Delete key.
You can use this set of commands for your convenience.
- Press Ctrl+H to delete the character that appears before the cursor.
- Press Ctrl+D to delete the character that appears before the cursor.
- To delete text highlight the text and click on the same. Select Cut.
- To delete the cursor at the end of a line or paragraph press Ctrl+K.
You can use these until you are able to find a solution that is permanent.
10. Reset your MacBook
There is one final solution to the problem of the delete key on Mac not working. You can restore your Mac’s factory settings if you so desire. This will remove all software errors and bugs from your system.
Before you do anything, you should make a system backup to ensure that nothing important is lost. This reset will likely restore the delete key to its full functionality.
11. Contact Apple Support
It is recommended that you contact Apple Support if the problem persists after you have tried all of the suggested solutions. Apple Support has a wealth of knowledge and expertise, and can offer tailored advice that is specific to the MacBook model and version.
Restore & recover!
The delete key is a vital component of every keyboard, even the MacBook. These methods, such as resetting keyboard configurations and cleaning the keypad, can be used to resolve the problem. Maintaining your MacBook’s keypad is essential to ensuring its performance and longevity.
We thank you for your reading. Please leave a comment below.