For years, Macs have lacked a native package manager. However, due to Homebrew, this no longer needs to be the case. Install Homebrew is an open-source package manager for Mac that allows you to easily search and install Homebrew applications from a wide library of third-party programs and tools. To make things easier, this post will demonstrate how to install Homebrew on your Mac.
Important lessons learned
- A Mac package manager called Homebrew seeks to make program updates, installations, and uninstalls easier.
- All Macs running macOS Big Sur or later can use homebrew.
- Install Homebrew Xcode, adding Xcode command line tools, downloading Homebrew from Github, setting up a system path for Homebrew, and lastly confirming the installation are the five steps involved in installing Homebrew on a Mac.
What is Mac Homebrew?
Homebrew is an open-source package administrator for the Mac. Homebrew allows you to easily search, install, and manage a wide range of command-line utilities and applications on your Mac. According to the makers, “Homebrew is a software that install Homebrew the stuff you need, but Apple didn’t.”
Homebrew provides a huge selection of software packages that can be installed, updated, and uninstalled using simple Terminal commands. This makes it excellent for individuals who need to install software regularly and without confusion.
Homebrew’s command-line interface allows you to rapidly install a variety of developer tools such as Python and open-source software such as Chromium-based web browsers that you use every day. It’s meant to be adaptable, so you may entirely adjust the installation procedure according to your individual requirements.
Advantages of getting homebrew
- Using Homebrew can save an important amount of time. App installation, compilation, and download are completely automated. It gets rid of the need to look for software installers and conduct out installation processes by hand.
- Homebrew is simple to set up and install. It just requires you to run a few short commands in Terminal.
- Finding the software you require is made simple with Homebrew, an open-source solution that provides an integrated library of software packages.
- You may quickly select the version of a certain software package you wish to install and alter the installation process with Homebrew.
- Because of its secure design, installing the software doesn’t require root access. By doing this, security holes are reduced.
Conditions for using Homebrew on a Mac
Before delving into the specifics of install Homebrew on Mac, let’s confirm that your machine exceeds the system requirements listed below:
- CPU/Chipset: 64-bit Intel or Apple Silicon M1/M2/M3 series
- System requirements: macOS Big Sur 11 or above
- Tools for the Command Line (CLT): Terminal, Xcode
- Shell: Any shell that is compatible with Bourne, such as fish, bash, or zsh.
How to install Homebrew on the macOS
Homebrew requires multiple dependencies to function, therefore you must download each of them. After that, you will need to download Homebrew from its GitHub source.
Here’s a full five-step approach for installing Homebrew on Mac running,
Use the App Store to install Xcode
With the help of Xcode, a built-in Integrated Development Environment (IDE) for macOS, developers may construct complex development systems and write software by using tools like debuggers and compilers.
Xcode is required for Homebrew, so you’ll need to get it from the App Store.
Note: Installing Homebrew on a Mac does not need downloading Xcode. To provide a more smooth user experience, I still advise doing this.
- Get the App Store open → Look for Xcode and select Get.
- After the download is complete, launch Xcode and select Install.
- After that, click Proceed to finish the installation.

It may be necessary for you to select the platform for which you want to build. You have to select macOS.
Install the Xcode command line tools
Once you’ve installed Xcode on your Mac, you’ll need to install the command line tools. These utilities enable your Mac to support some of the Homebrew package components.
- Use Launchpad or Spotlight to open Terminal on your Mac.
You may also access Terminal via Finder → Applications → Utilities. - Enter
xcode-selectIn the Terminal window, type “brew analytics off” and hit Return.--installin the Terminal, Press return.

- When a popup displays, select Install.
- Go over the License Agreement and then click Agree.
- If you have not connected the Mac to power, you will be encouraged to do so. If your Mac’s battery is 50% charged, you may click Continue on Battery Power.
- Once the Xcode command line tools have been downloaded and installed, choose Done.
Access the Homebrew repository on GitHub
Once Xcode and the command line tools for it are available, you may get Homebrew from the official GitHub source using the Terminal on your Mac.
Even if there are other Homebrew branches out there, installing the original one is strongly recommended to guarantee maximum compatibility.
- On your Mac, open Terminal.
- Copy and paste the command below into the Terminal window, then hit Return.
"$(curl -fsSL)" in /bin/bash
install.sh from https://raw.githubusercontent.com/Homebrew/install/HEAD" - Enter the password for your Mac now, then press return to proceed.
Note: The password is recorded in the background even if you cannot see it when typing it.
- To continue, hit the return key again.
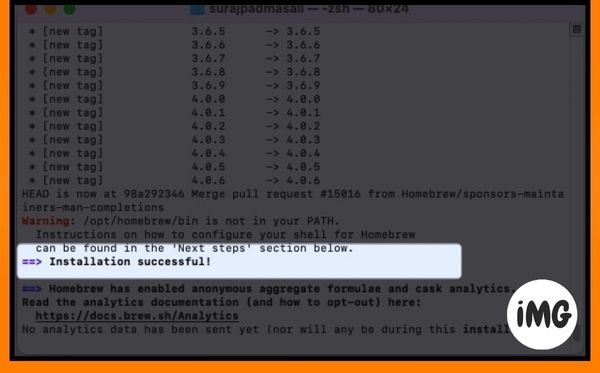
- After a few instructions, your screen will show an Installation success message.
Add the Homebrew path
After installing Homebrew, you must add it to your Mac’s system path. Adding Homebrew to the system path simplifies locating, installing, using, and managing software packages.
If you choose to skip this step, you can still use Homebrew; however, you will need to provide Homebrew’s installation path every time you access it using the Terminal. But why bother? Adding a system route simplifies things.
- Open the Terminal app on your Mac.
- Paste the provided commands one by one, pressing return after each.
copy /opt/homebrew/bin/lsPATH = $PATH : /opt/homebrew/binCD.zshrc touch.zshrc -> echo export PATH=$PATH:/opt/homebrew/binBrew Doctor

Your system is ready to brew, according to the notice that appears after you type these commands.
And that’s it! You can start using Homebrew after making sure it has been installed successfully!
Verify that Homebrew is installed successfully
After you’ve finished installing Homebrew on your Mac, make sure it’s installed correctly. Here’s how you can accomplish this:
- On your Mac, open Terminal.
- In the Terminal window, type
brew -vand then hit Return.
Should Homebrew be installed properly, its version number will be displayed to you. - Should the previous command have failed, try typing
brew doctorand pressing Return.
Using this command, possible issues in the Homebrew installation will be examined.
If you see brew -v followed by the Homebrew version, it implies that Homebrew has been correctly installed. If you get a second problem notice, simply follow the instructions and restart the procedure.
How to use Homebrew to install packages
This is where all of your efforts will pay off. After successfully installing Homebrew on your Mac, follow the instructions below to rapidly locate and install the programs of your choosing.
- Open the Terminal app on your Mac.
- Enter
brew search (SearchTerm)into the Terminal.
You must replace(SearchTerm)with the package that you are looking for. I’ve decided to use Firefox here. - To obtain information about a package, use
brew info (PackageName).
The package name(PackageName)must be substituted. - In the Terminal window, type
brew install (PackageName).
The package name(PackageName)must be substituted. I entered firefox since I’m installing the Firefox browser in my situation.
Software installed using Homebrew will launch automatically in the Launchpad. However, you can locate the downloaded packages—also referred to as casks—under /opt/homebrew/caskroom in Finder if you’d want to access them.
How to use Homebrew to remove packages
You may easily remove or uninstall individual packages or programs from your Mac by using the following Homebrew command.
- On your Mac, open Terminal.
- In the Terminal window, type “
brew list” and hit return.
You may use this command to get a list of every program you installed using Homebrew.

- In the Terminal window, type
brew remove (PackageName).
The package name(PackageName)must be substituted. We’ve entered Firefox since, in this instance, we’re uninstalling the Firefox browser.
How to turn off analytics in Homebrew
While homebrew is open-source, it captures and shares analytical data with developers to help them improve the product. As a result, if you do not wish to participate and share your data, you can disable Homebrew Analytics.
Remember that this step is optional, but I encourage you to follow the instructions below to disable analytics and keep your data safe and secure.
- On your Mac, open Terminal.
- Enter “
brew analytics off” in the Terminal window and press Return.
How to use Homebrew to update applications
In addition to providing an uninstalled software package, Homebrew provides an easy way to update your applications. Here’s how you should go about it:
- On your Mac, open Terminal.
- In the Terminal window, type “
brew outdated” and hit return.
This command will provide a list of all the applications that require updates. - Input the Terminal with “
brew upgrade (PackageName)” and hit the return key.
The package name(PackageName)must be substituted.

The techniques outlined above can help you update particular apps. If you wish to update all applications at once, type brew upgrade and click return.
How to update Mac Homebrew
Just like any other Mac program, Homebrew is updated on a regular basis with new features and improvements. The following is how to update Homebrew:
- On your Mac, open Terminal.
- In the Terminal window, type
brew updateand hit Return.
How to remove Homebrew on a Mac
If Homebrew wasn’t helpful to you and you want to get rid of it from your Mac, you may delete so quickly and simply by following the steps listed below.
- On your Mac, open Terminal.
- Paste the command into the terminal window after copying it. Then, hit Return.
"$(curl fsSL)" in /bin/bashthe following URL: https://raw.githubusercontent.com/Homebrew/install/HEAD/uninstall.sh" - In the Terminal window, type y. Then, hit Return.
- Next, input the password for your Mac.
Following that, Homebrew will be removed from your Mac.
FAQs
Is it required to install Homebrew on your Mac?
It is not necessary to install Homebrew on your Mac. Homebrew, on the other hand, may be a useful tool for swiftly downloading programs and development tools onto your device without having to navigate a web browser.
Can I use Homebrew to install programs that have a GUI?
Yes, of course. Aside from installing developer tools such as git, Homebrew may also be used to install graphical user interface applications. However, installing the Homebrew cask is suggested if you want to efficiently handle GUI programs.
On a Mac, where is Homebrew installed?
Homebrew is normally installed to /opt/homebrew (on Apple Silicon Macs) or /usr/local/bin (on Intel Macs), unless otherwise noted during the installation process.
Is M2 Mac Homebrew compatible?
Indeed. All M1/M2/M3 Apple Silicon and Intel Macs that support at least macOS Big Sur or later macOS versions, such Ventura and Sonoma, may be configured to run homebrew.
Ending…
Whether you’re a developer, system administrator, or just a normal user, Homebrew provides an effortless method to manage programs on Mac. Follow the instructions in this article to install Homebrew on your Mac. But if you run into any problems, do let us know in the comments area.
Tell us what you think of homebrew as well. Do you think you’d use it frequently enough to justify the trouble, or not?