
Have you ever wondered how to create a take a screenshot on Mac OS X? This is a handy skill for a variety of reasons, such as saving important information, sharing things online, or grabbing awesome graphics.
You may already be familiar with some of the most popular shortcuts for Mac. Let’s say you want to take a picture of your whole screen on a Mac. Can you just press a few buttons: Command (the one with the ⌘ symbol), Shift, and 3. Sure! If you want to capture just a part of your screen on a Mac, you can press Command, Shift, and 4 together. Recall that these shortcut keys are not the only simple ways to take images on a Mac; there are others as well.
This ultimate guide for Mac screenshots will take you from the basics through to advanced techniques.
Shortcuts for the keyboard:
- Hold Shift and Command + 3 together to capture a screenshot of the entire Mac screen.
- Hold Shift + Command + 4, and then screenshot a part of the Mac screen.
- Hold Shift, Command and 4, then press Space. This will screenshot a Mac window.
Check out this quick and simple video on how to take Mac screenshots. The detailed steps can be found below if you prefer to read.
Mac keyboard shortcuts for taking screenshots
Macs have keyboard shortcuts that make it easy to take screenshots. This is an overview:
| Keyboard Shortcut | Function |
|---|---|
| Command (⌘) + Shift (⇧) + 3 | Screenshots of the entire display can be taken. |
| Command (⌘) + Shift (⇧) + 4 | Allows you to highlight an area and take a part screenshot. |
| Command (⌘) + Shift (⇧) + 5 | Screen recording and more screenshot options are available when you open the Screenshot application. |
| Command (⌘) + Shift (⇧) + 6 | Take a screenshot of the Touch Bar on your Mac, if it has one. |
Below I will explain how to use these shortcuts optimally.
How do I take a screenshot on Mac?
Use Command+ Shift+3 to take a screenshot of your Mac’s entire screen. This includes the Dock, the top menu bar and everything else.
This action will take a snapshot instantly. You’ll be able to see a thumbnail at the bottom of your screen.
Click on the small window to see a screenshot of what you just took.

How to take a screenshot of a portion on your Mac screen
Stop typing when you spot the little plus sign (+). Drag it and click to highlight the area that you wish to capture. Let go of the trackpad or mouse button when you’re happy with what you’ve chosen. Your Mac will take a photo of the selected area and save it.
How do I take a screenshot on a Mac window
Press Command + Shift plus 4 to capture only an opened window on Mac. Release the keys when you see the small blinking line. Click the spacebar one time.
Click on the icon in any window. You can use this to take a screenshot just of the Dock, menu bar or other areas. These screenshots have a lovely grey shading around the edges.
As previously noted, a screenshot thumbnail may be seen in the lower-right corner. After a few moments, it will disappear and be saved. Click on the image to crop, mark up, share, etc.
How to use and access the Screenshot Toolbar on Mac
You can’t remember the keys above? You can also open the Screenshot application using Search Spotlight. Press Command and Spacebar. Type screenshot in the search bar.
It’s possible that you can only recall one mix. With the help of these tools, you may record your Mac activities in a movie or snap a snapshot of what’s on your screen. To do this, hold down Command + shift + 5
These choices give you a window to pick from and a row of buttons underneath with different things you can do. Continue reading to find out how you can get the most from it.
Take Screenshots with toolbar options
Use either of the above two methods to open the Screenshot App.
- To capture the entire screen: Select Capture The Entire Screen. Left click to capture.
- To crop screenshots: select Capture Selected Part – Drag the corners to select the portion you want – Click and drag the window to move it – Press Capture.

- To capture a specific window or menu: To take a screenshot of a particular window or menu, select Capture Select Window – Navigate to the Windows that you wish to capture. – Click on the left side.
- To record Mac Screen: To your right, next to these three screenshots options, there are two buttons that allow you to record the screen. You can screen record your Mac’s entire window with the first option, and a portion of it using the second.
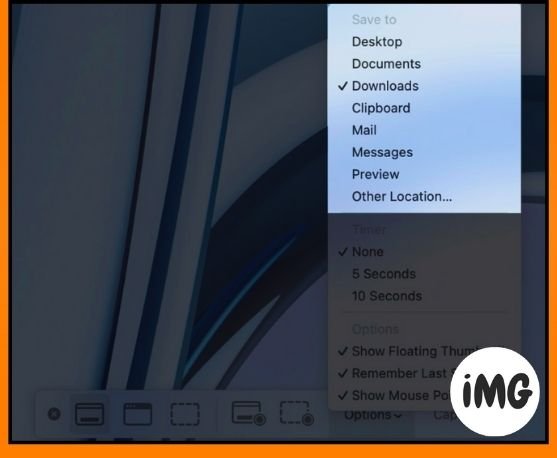
You can also go to the Options menu to make the app suit you better. You can move where the screenshot goes or set a timer if you want.
How To Take Screenshots Without Using Mac Keyboard
You don’t need to worry if you can’t remember all your keyboard shortcuts or you don’t have access a keyboard. Here’s how you can snap screenshots on your Mac without knowing the keyboard shortcuts.
Method 1: Screenshot tool
- Launchpad or Spotlight Search the Screenshot App.
- You will now see the Toolbar on the bottom.
- Click Capture to select the desired Window option.
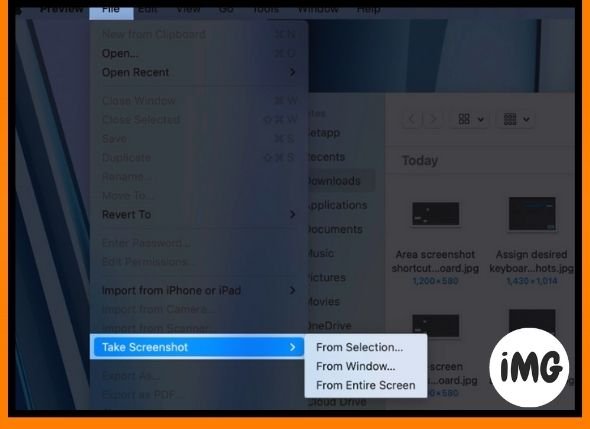
Method 2 – Using the Preview app
Preview can be used to take screenshots, just like the Mac Screenshot application.
- Launch the preview application from Launchpad or Spotlight.
- Click File in the menu bar at the top.
- Pick Take Screenshot Select one of the following options:
- From selection is used to take a screenshot of an area.
- Window To capture a screenshot from a window.
- Take a Screenshot of Entire Screen To take a screen shot of the entire display.
Tip : Imagine you want to screenshot Chrome with Preview. Open the Preview app and you will see the Preview menu in the top bar. Don’t really tap the Chrome window; just gesture at it. Clicking on it, or any other application window will replace the menu in the top bar.
How to copy screenshots on Mac without saving
You can save a screenshot to your desktop, or any other location you choose. We have found a way to copy a screenshot to the clipboard without having to use any additional code.
The actual file will not be saved. You can take a picture of your screen and put it into other apps like Notes, Word, or Google Docs.
Change default location for saved screenshots in Mac
Typically, a screenshot you take of your screen saves directly to your desktop for easy access. All of them can be found here.
Pro Tips:
- Select all the screenshots and right-click to choose Create a new folder with selection.
- Drag the thumbnail image to any folder.
Change the default location for screenshots saved on Mac:
- Click Options.
- Choose a location from the Save To.
Press here to go somewhere else.
All future screenshots are saved to the location you select. This setting will remain in place even if the Mac is restarted.
How to take a screenshot entire webpages on Mac
Safari on iOS offers the native option to capture a scrolling screenshot of the entire webpage . This option is not available in macOS. You’ll need to use a few workarounds.
You can capture a screenshot of a whole webpage in Safari for Mac using two different methods. The first method involves exporting the webpage as a pdf file. The second requires using a developer tool.
Ensure that the page has loaded properly. You may be missing out on important information.
Export web page to PDF
- Take a screenshot by visiting the page you want to capture.
- Click File in the menu bar.
- Choose Export to PDF in the drop-down list.
- Choose a location for the file and click Save.
The entire webpage appears when you open the PDF. The page will appear as a scanned version.
Take screenshots using Developer tools
The end result will still be a PDF file. If you’d like to save an entire page as an image, what do you do? You’ll need to follow this somewhat complicated path.
- Click Safari – Setting from the menu bar.
- Select the Advanced menu – Show features for Web developers.
- Open Safari again and select the page of your choice.
- Select Connect web Inspector from the menu bar.
- You should now see the HTML code for the page on your screen. Choose the first line.
- Right-click The first line that starts with html strong=” choose=” -=””> Capture Screenshot using the drop-down list.
- The details of a webpage may take some time to be captured. As soon as the Save As menu appears, select a folder and location that you prefer. Next, select “Save.”

The screenshot is saved in your preferred location. Click on the close icon (X) to exit the Web Inspector. The browser will return to the previous interface you browsed.
Google Chrome has a special tool for developers that does something similar. If you use Firefox, the browser provides a direct option for capturing the entire page.
Best third party apps for Mac to take screenshots
Mac provides multiple options to capture your desired screenshot. It is difficult to remember all the keyboard shortcuts. You can use special tools on a Mac computer to take pictures of your screen, like:
- Monosnap
- Lightshot Screenshot
- Shottr
You can annotate or share screenshots directly with these apps. Take screenshots while you scroll as well.
How to edit screenshots in Mac
Click the floating thumbnail to open the screenshot or click Preview in the app. Click the button on the toolbar.
You can now add shapes, draw whatever you want, put your own signature, overlay text, adjust screenshot colours, resize an image, and more. Save the screenshot after editing it.
For more information on editing screenshots, check out our guide on and how to use the Markup Tool.
Screenshots not working in Mac? You can fix it!
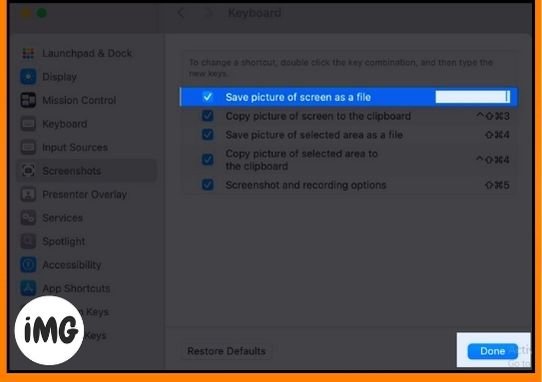
If the keyboard shortcuts mentioned above have failed to capture a screenshot, what can you do? You must then ensure that Keyboard shortcuts is enabled.
Make sure your quick ways of doing things are the same as the actual words or actions you use. If you don’t, your Mac won’t recognize the shortcut command.
For more information on how to resolve the issue of screenshots not working on Mac, please read our troubleshooting article.
Wrap up
This guide should have made it easier for you to understand how to take screenshots on your Mac. Please feel free to leave any questions or comments about this guide in the comment section below. Happy screenshotting!