If you are a Mac user and need to distribute huge files by email or another method, making zip and unzip files might be useful. Zipping a file or folder is a simple and effective approach to reduce file size while retaining its information. In this video, I’ll demonstrate a few simple techniques to zip and unzip files on your Mac.
What is a zip file, and how come they are used?
A compressed and archived file is called a zip and unzip files. For ease of sharing and storing, it condenses one or more files into a single, smaller file.
Large volumes of data may be transported faster and with less bandwidth by using zip files, which are widely used for file storage and transmission via emails and other online platforms. They can also be used to store files in a compressed format, which frees up disc space, or for backup purposes.
Remember that after a zip and unzip files is extracted, the original files and folders can be utilized again and are returned to their original state.
Advantages of using a zip file on Mac
- Compared to the original file, the compressed files occupy less space on your Mac.
- Smaller and quicker to upload and download are compressed files.
- It is simpler to organize and locate files when pertinent files are gathered into a single package using zip and unzip files.
- An extra layer of security may be added to zipped files or folders containing sensitive data by adding password protection.
- In the case of data loss or system failures, data can be more easily restored when compressed files serve as backups for important files and folders.
- These compressed files are easy to open and extract on a variety of operating systems, facilitating file sharing.
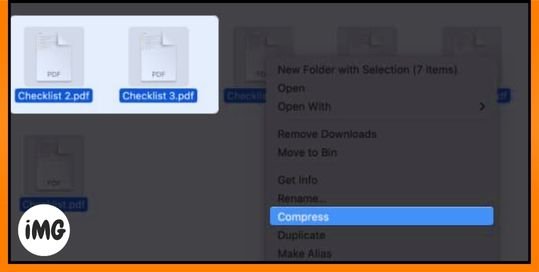
How to zip a file on the Mac
- Open Finder and find the files you want.
- Make sure you have every file you wish to zip.
- On the files, do a right-click.
- Select Compress.

Congratulations, you have successfully compressed your file. The zip file will now display next to your original file.
To compress a single file, pick it, right-click, and select Compress “your file name.”
Zip files on a Mac using the native utilities
- Press and hold the space bar to open Spotlight.
- Locate and open Archive Utility.

- In Finder, pick the appropriate files.
- Drag the chosen file or files to the Dock’s Archive Utility icon, which is a green folder with a chain.

- The Archive Utility will compress your files, and after completed, they will appear alongside the original file in Finder.
One thing to bear in mind is that if you drag a large number of files into Archive Utility, the software will generate distinct zip and unzip files for each folder.
How to unzip files on the Mac
You may unzip these files in a number of methods, and it’s an easy task. All of the methods for doing so are enumerated here.
- Double-click: To unpack a compressed file, go to it and double-click.
- Right-click: Locate the file, then right-click it to choose Open.
As an alternative, you may choose Archive Utility by right-clicking the file and then selecting Open with. - Open Archive Utility: Find the ZIP file, and then drag and drop it into the dock menu’s green, zip-sealed folder icon.
FAQs
Are there any zip tools that come with Mac?
Yes, every Mac comes with Archive Utility, a zip tool that you can use right away.
Can I open BIN files on my Mac?
BIN files may usually be unzipped. BIN files include disk images, firmware updates, and other application files.
How come I can’t open zip files on my Mac?
Mac zip and unzip files, however sometimes it doesn’t function. Lost, corrupted, or password-protected files may be the cause.
Finishing up…
On a Mac, wasn’t it simple to zip and unzip files? But in addition to the previously discussed techniques, you may also compress files and store them more efficiently by using the Mac terminal. Please feel free to share any more issues you are having with your Apple products in the comments section, and I will try my best to come up with a solution.


